

What is column mode?
Column Mode is an often-unknown feature of UltraEdit for many users, and experience has shown that those who have become familiar with it no longer want to go without it.
This powerful feature changes the way in which UltraEdit selects and edits text. Normally this is done horizontally from character to character, and Column Mode changes this mechanism to vertical processing.
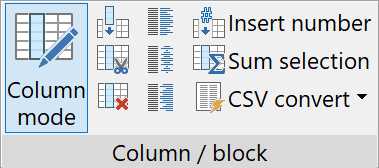
This mode is activated program-wide via the keyboard shortcut Alt + C and can be activated simultaneously via Edit -> Column / block (Ribbon mode), Edit -> Column mode (Contemporary menu mode) or Column -> Column mode (Traditional menu mode):
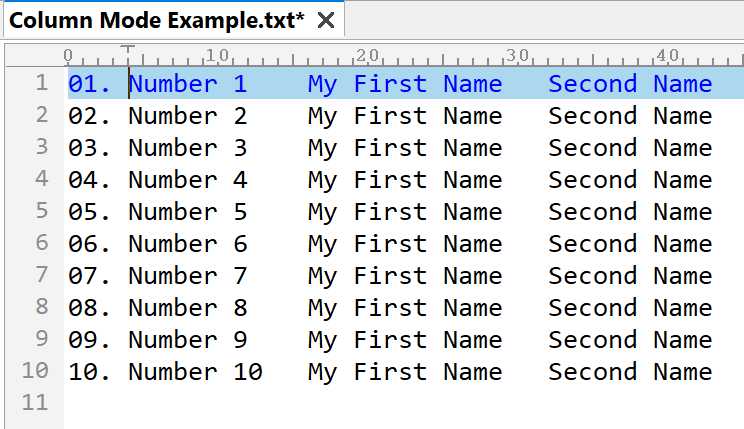
For further understanding, we will use a simple example with a text file consisting of 3 columns and 10 lines. Once activated, UltraEdit will highlight the text based on the column position of the first character the user selects to the column of the last character he selects. Text selected in column mode does not automatically include all text between the start and end position, but does include all text in the columns between the first and last character which is selected.
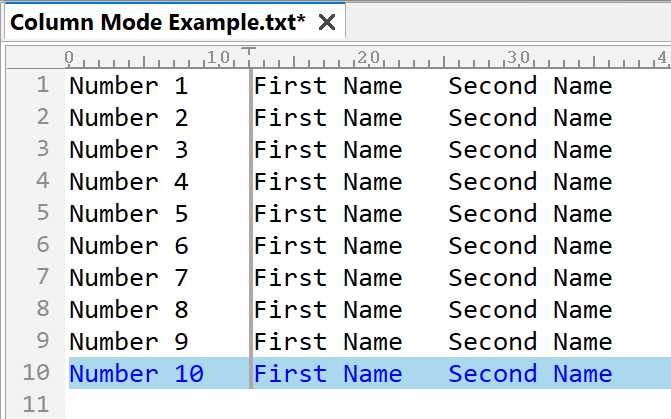
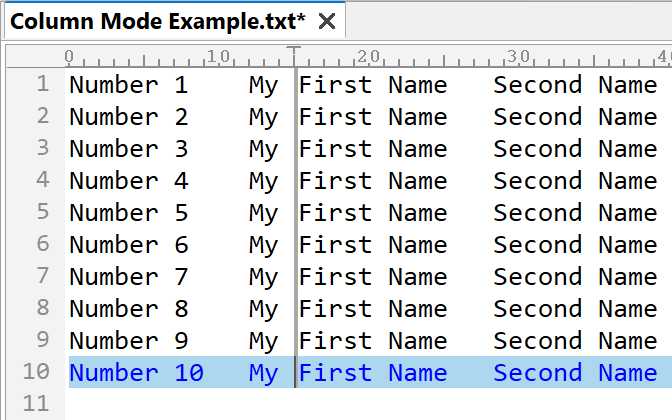
Assuming we would like to insert text before the second column, the position in the column and for the desired rows is marked so that we find the marker seen in the following first figure. This simple marker does not select a character or word, but a simple vertical position. By entering new text, e.g. the word “My “ this is now done across all selected lines (see the following second figure):
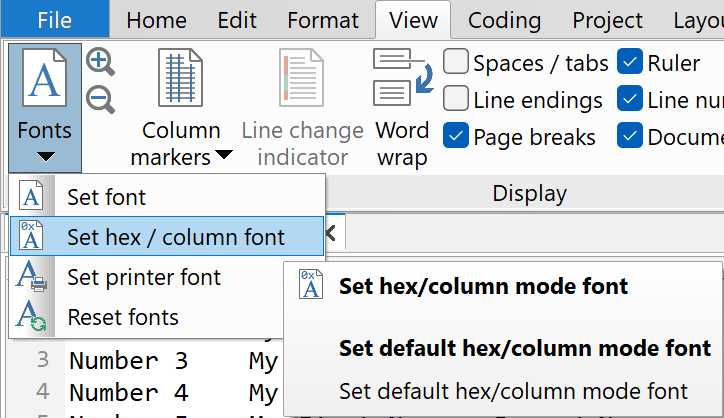
UltraEdit allows the user to specify the font to be used in Column Mode separately. This font is selected via View -> Fonts -> Set hex / column font (Ribbon mode and Contemporary menu mode) or View -> Set hex / column font (Traditional menu mode).
Pro tip: if fast editing without prior separate activation of the Column Mode is important, the Quick Column Mode is a good option. The same column selection can also be used via Alt + Click-n-drag, which automatically activates Column Mode. Column mode is then deactivated as soon as the cursor is repositioned.
Basically, there are 3 functions for editing columns, described in more detail below. The Insert / fill columns function can be used to enter text that is inserted into a special column. If several rows are selected, the text is entered in these selected rows. If no lines are selected, text is entered for all lines in the file. The dialog Insert/Fill Columns appears for this, in which the text is entered. The lower option is called Do not insert / fill on empty last line and prevents this text from being inserted in the last line of the file if this line is empty.
The further options Cut columns and Delete columns open a separate dialog in which the number of columns to cut/delete from every line staring at the current line and the current column can be specified (0 means to cut/delete columns based on highlighted text).
By using the justify options for left, center and right the user can justify a selected column of data, with the boundaries of the selection acting as the margins. Left-justifying a column of data will justify the data against the left of your selection, while right-justifying will do the opposite. Center-justifying the column of data will center the data within the selection.
As soon as any kind of line numbering is required, the Insert Number function is quite useful, which opens the dialog of the same name. Various options can be defined in this dialog:
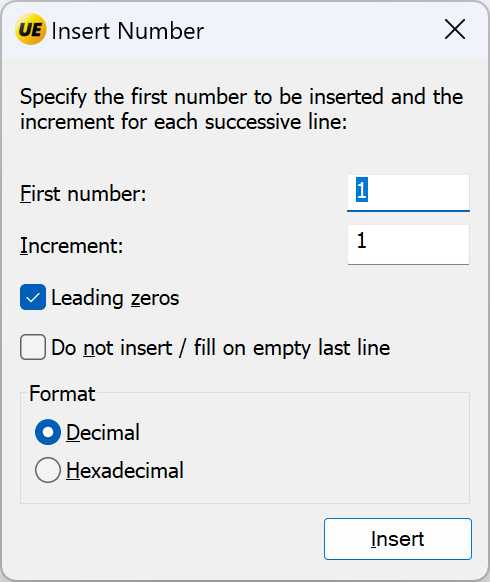
- First number: describes the first starting number for the
counting - Increment: defines the steps in which the number is to be
increased - Leading zeros: determines whether shorter numbers are
padded with leading zeros to match the longest
number (such as 001 to 100) - Do not insert / fill on empty last line: prevents the
numbering in the last line if it is empty - Format: allows a distinction between decimal or
hexadecimal notation.
If we use our original Column Mode example from the beginning and want to insert a number before each row, we select rows 1 to 10 in the first column, open the Insert Numbers dialog and press Insert at the bottom. We could also subsequently insert a space after the rows or a dot, depending on the requirements:
Please note: In our Column Mode example, we indeed have an 11th empty line, so it would make sense to enable the option Do not insert / fill on empty last line inside the Insert Numbers dialog.
The Sum function can be used to convert selected text areas into digits and add them up to a total. To do this, the user can select the area in Column mode, then select the Sum selection function and the Sum Selected Text dialog appears:
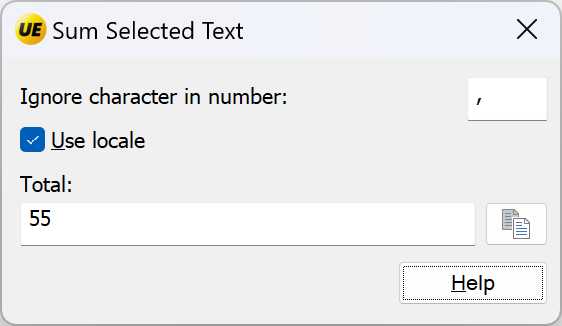
- Ignore character in number: because some number formats contain non-digits characters, such as commas, dots or dashes, these characters can be ignored – leaving only the pure digits for the sum
- Use locale: uses the Windows locale for the thousand separator, e.g. “,” or “.”
- Total: contains the final result of the sum function
- Copy to Clipboard: copies the sum to the clipboard
- Help: opens the UltraEdit Online help system.
In our example above, we have selected the numbers added via the Insert Number function at the beginning of the line, and these are the line numbers 01 to 10. The sum of these line numbers is then 55, as calculated correctly by UltraEdit.
Another great strength of Column Mode is the handling of CSV files. These text files, known as Comma-Separated Values, are often used for lists, whereby several columns are separated from each other by a separator character (often a semicolon). Many spreadsheet programs allow tables to be saved and exported in this format. However, editing these files where column manipulation is required can be difficult because the column widths vary and do not have a fixed size. UltraEdit therefore has two functions that convert a CSV file to a file with a fixed column width and the reverse process via a conversion to a CSV file.
The first function is called Convert to fixed-width and opens the dialog Convert to Fixed Columns:
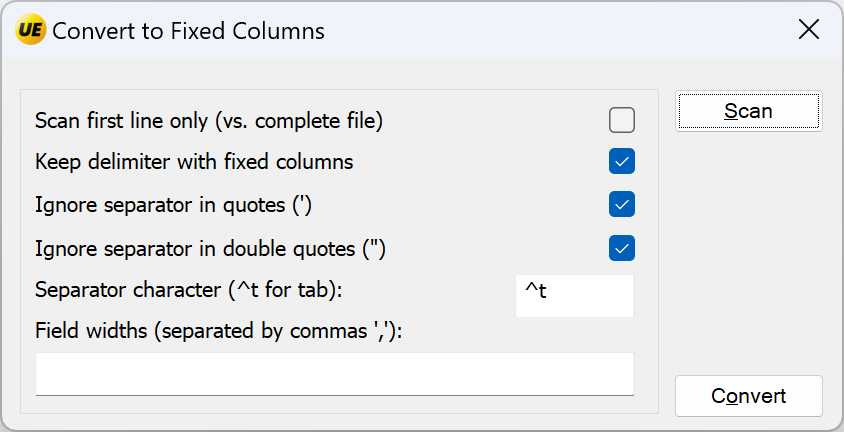
In this dialogue, the user can define the properties before UltraEdit analyzes the file content with the Scan button and finally converts it with the Convert button:
- Scan first line only (vs. complete file): instructs UltraEdit to search just the first line for the field widths
- Keep delimiter with fixed columns: means that when converting to fixed width columns the delimiter character for the fields will not be removed. If this option is disabled, the conversion process will remove the delimiter between fields
- Ignore separator in quotes (‘): if enabled, separator characters which are enclosed in single quotes will not be taken into account when scanning to determine column spacing for alignment
- Ignore separator in double quotes (“): this option is identical to the previous option, except that double quotes are taken into account instead of single quotes
- Separator character (^t for tab): defines the delimiter character between fields (for the TAB character “^t” should be used). In all other cases, a single character should be entered and UltraEdit uses this character to determine the field boundaries
- Field widths (separated by commas ‘, ‘): represents a list of comma-separated field widths used for the conversion process. If there are more fields than entries, the last entry will be used as the field width for the remaining fields, which allows the user to set a single entry, if all fields are required to be the same width. Please note, that this field must not be left empty when the conversion to fixed columns is executed. It may be populated automatically by pressing the Scan button after specifying the conversion options, or the user may manually specify field widths if desired
- Scan: UltraEdit scans the file (or first line) and determines the maximum field widths for each field. This will determine the maximum width required for each field and place the results (comma separated) in the Field widths edit field.
- Convert: performs the conversion from character delimited text to fixed column according to the defined settings – the complete file will be converted.
The opposite can be performed with the Convert fixed-width to CSV function, which opens the Convert to “Characters Delimited” text dialog:
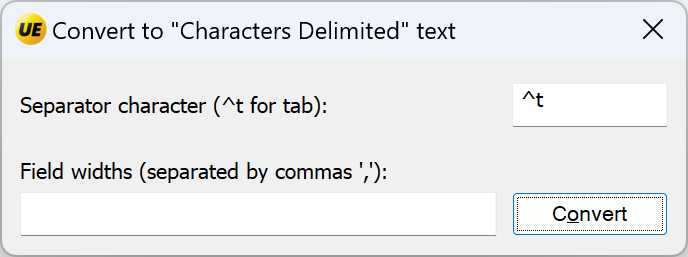
- Separator character (^t for tab): defines the delimiter character between fields (for the TAB character “^t” should be used). In all other cases, a single character should be entered and UltraEdit uses this character to determine the field boundaries
- Field widths (separated by commas ‘, ‘): represents a list of comma-separated field widths used for the conversion process. If there are more fields than entries, the last entry will be used as the field width for the remaining fields, which allows the user to set a single entry, if all fields are required to be the same width
- Convert: performs the conversion from fixed column to character delimited text according to the defined settings – the complete file will be converted.
Configuration of Column Mode
The performance of a function essentially depends on its flexibility and configurability, and here UltraEdit offers fine-grained settings. These can be opened either via Advanced -> Settings (Ribbon mode), via Advanced -> Configuration (Traditional menu mode) or via Advanced -> Settings (Contemporary menu mode). All three options open the Configuration dialog, in which all settings are contained in a central location. Within this dialog, the user needs to navigate to the category Editor -> Column mode to open the options for Column Mode:
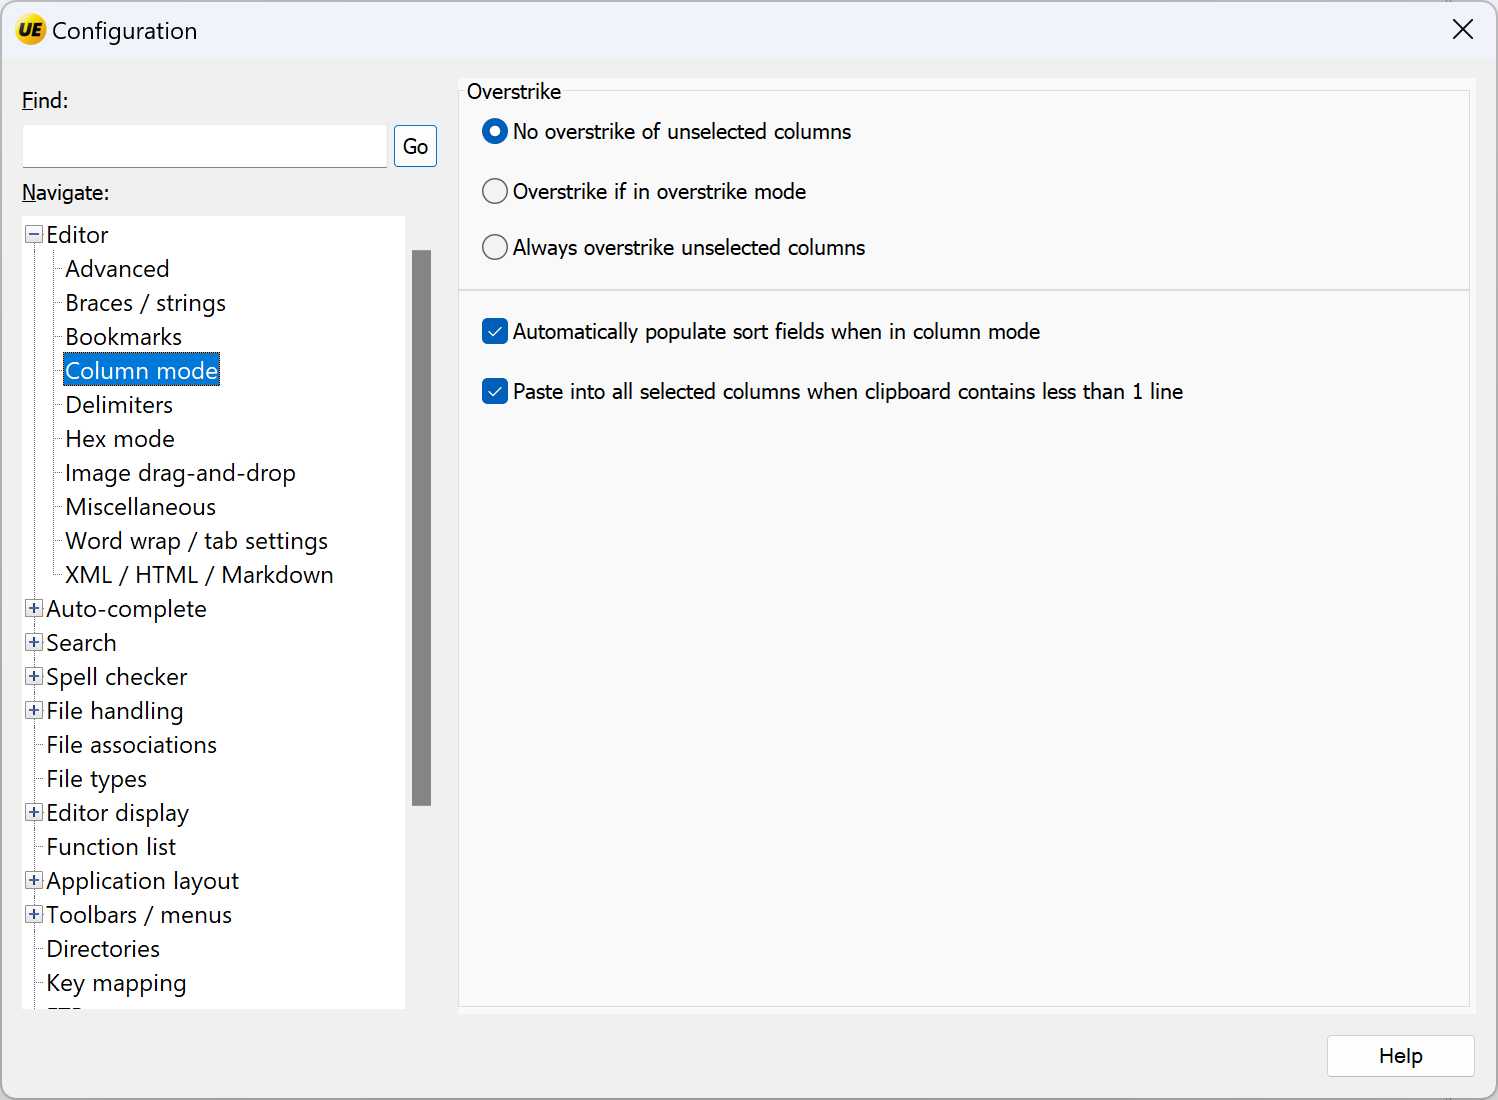
- Overstrike: handles the overstrike in Column mode and under which circumstances the overstrike is prevented:
- No overstrike of unselected columns: should be selected, if the user never wants overstrike mode to be used with column operations
- Overstrike if in overstrike mode: means that the column operations operate either in insert mode (as default) or overstrike/overpaste mode based on the insert/overstrike keyboard setting. This is toggled by the Insert Key and shows up on the UltraEdit status bar. If in overstrike mode, cut/delete operations will remove the contents but leave spaces so that column data is not shifted. Paste operations will paste over the current position data and not shift columns either
- Always overstrike unselected columns: should be selected, if overstrike mode is required permanently for column mode.
- Automatically populate sort fields when in column mode: controls the behavior of selected text in column mode. If this option is enabled, in that case the column values for the current selection will be used to automatically populate sort fields in the Advanced Sort/Option dialog when the Sort function is invoked
- Paste into all selected columns when clipboard contains less than 1 line: by using this option and when a multi-line selection exists in column mode, a single string copied to the clipboard will paste to all selected lines. If this option is disabled, the column mode paste would only apply to the first selected line.
Two practical examples for the Column Mode:
Finally, we would like to describe two practical scenarios that can be used to understand the performance of the Column Mode. Even if the following two scenarios appear relatively compact, these options should always be considered on a larger scale. A realistic question would be: how much time and effort would I save if I had to edit not just a 10-line log file, but a 1,000,000-line log file?
Scenario 1:
For this first scenario, we have Delphi source code, and as can be seen in the following upper left figure, the procedure Button1Click is shown, which describes those activities as soon as the button with the name Button1 is pressed. We now extend the source code with a so-called if-then query, which describes a coherent code action with a subsequent begin, that is terminated again with end; (in the following upper right figure). This begin-end block is usually indented two positions to the right, which favors a more structured syntax. We therefore activate the UltraEdit column mode and first mark the lines to be indented at the respective position (please see the following lower left figure). If we now insert a space twice with this positioning, the entire selected block is indented to the right and we have achieved our result (please see the following lower right figure):
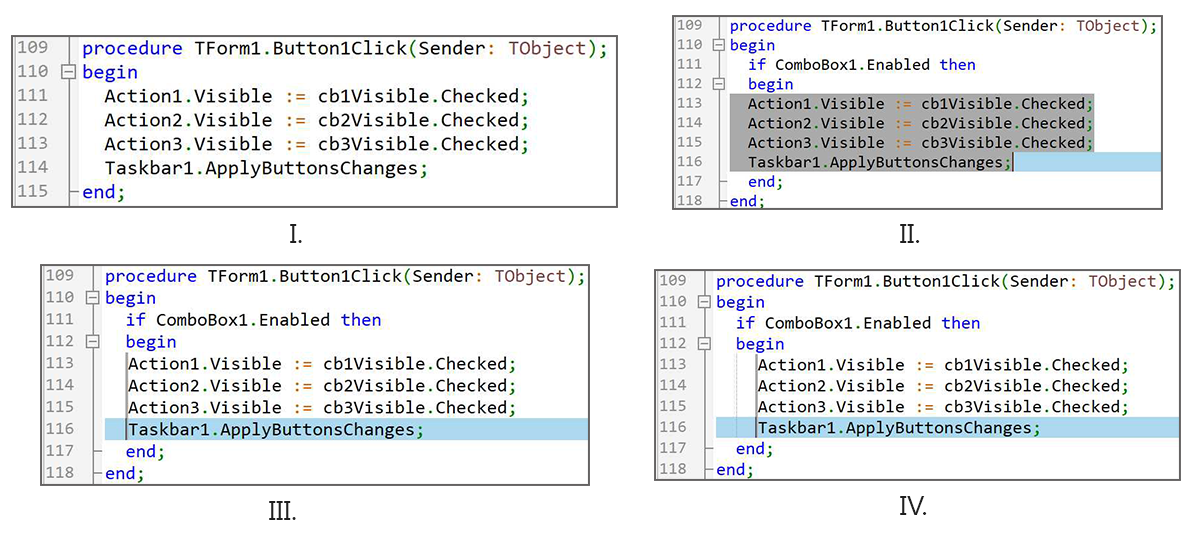
Pro tip: The same method can also be used to comment out a code block of any size by entering the two characters // instead of 2 spaces. In Object Pascal and C++, this means that the respective line is commented out, which is then applied to the entire selected block in column mode.
Scenario 2:
In this second scenario, we use a log file, as they exist in many IT sectors; UltraEdit is known for processing extremely large files. Our log file consists of 4 columns and 11 lines, of which the first line is the header. The columns are named Number, Date, Owner and Value:
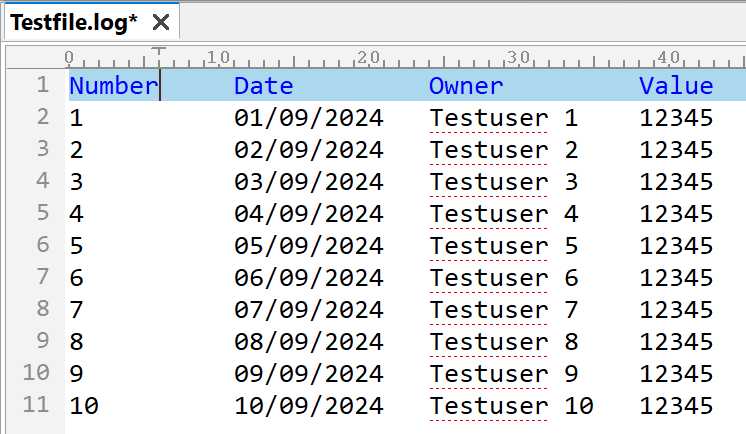
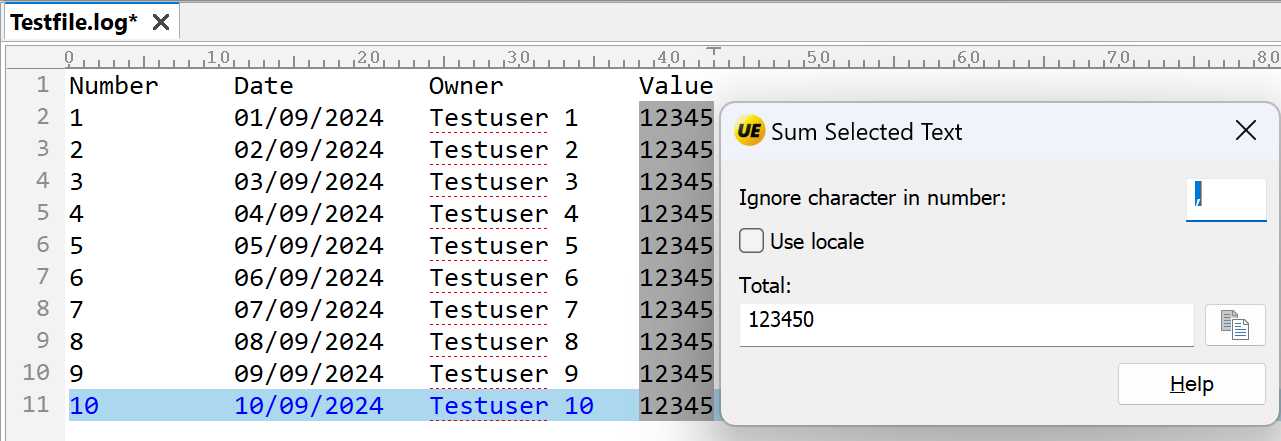
First, we want to use the Sum selection function and therefore activate the Column Mode, select the Value column in lines 2-11 (without the header row), and select Sum selection (e.g. from the Edit -> Column / block tab in Ribbon mode). The Sum Selected Text dialog box then opens and the sum is displayed correctly in the Total field with 123450:
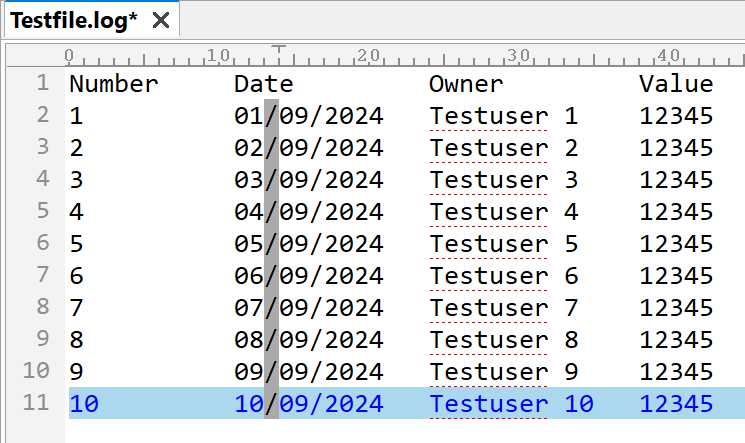
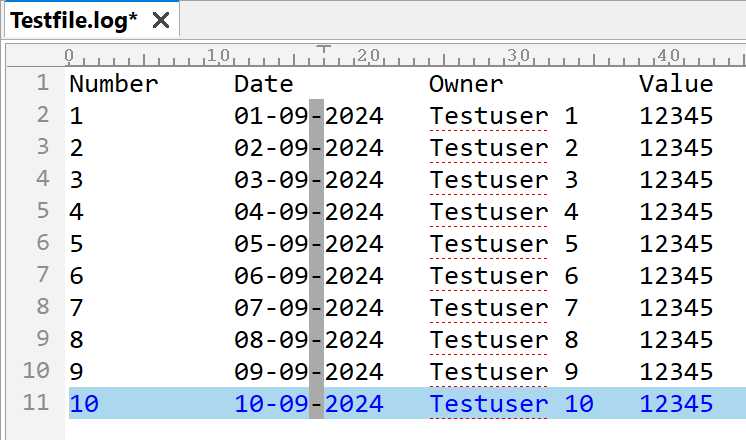
In the next step, we would like to replace the slashes in the date column with hyphens. A “01/09/2024” should therefore become a “01-09-2024”. To do this, we select the first slash column in column 2 within rows 2-11 (without the header row) as seen in the following top figure and activate overstrike mode by entering a hyphen. This means that the slash in all selected rows is overwritten by a hyphen. We repeat the same process in the second position of the slash so that we achieve a result as shown in the following bottom figure:
Summary:
UltraEdit’s Column Mode is a powerful feature for editing text and source code in a new way than was previously possible. Combined with the flexibility and processing of extremely large files, even gigabyte-sized log files can be edited vertically.
Additional functions allow the handling of new/existing columns, the change of alignment (left/center/right), the flexible insertion of numbers, a sum function as well as the conversion to and from CSV files with variable column width to a fixed column width and vice versa.
Column mode can be further configured in the UltraEdit settings, and the experience with customers has shown that anyone who has got to know this function appreciates it and no longer wants to work without it. With this in mind, have fun boosting your productivity!


0 Comments